These instructions are Windows based but Linux users should have no difficulty adjusting them for their environment.
Checking your installation
If you already have SOA Suite and JDeveloper installed, confirm that you have the correct version and configuration by following the steps in the section below called Testing your installation. In addition, you may want to complete the items in the section called Additional actions. Finally, you must complete the section called Configuration to run a tutorial.
What you will need and where to get it
This installation requires 3 GB or more available memory. If you have less memory, try separating the installation of the database, the servers, and JDeveloper onto different machines.
Memory and Disk Space requirements
This installation requires 3 GB or more available memory. If you have less memory, try separating the installation of the database, the servers, and JDeveloper onto different machines.
The installation process requires about 12 GB of disk space. After installation, you can delete the files used by installation to save about 4 GB.
As you can see, you are installing a lot of software with a large memory and disk footprint. Running your disk defragmentation program now, before you start downloading and installing, can significantly improve install time as well as performance and disk space usage later on.
Downloading files
Download all the software to get started.
1. In the following steps, save all downloaded files to c:stageSOA. This document assumes that path. If you save them somewhere else then make sure there are no spaces in your path and adjust accordingly when c:stageSOA is referenced in this document.
o WebLogic Server:
wls1031_win32.exe
o Repository Creation Utility:
ofm_rcu_win32_11.1.1.1.0_disk1_1of1.zip
o SOA Suite:
ofm_soa_generic_11.1.1.1.0_disk1_1of1.zip
o JDeveloper Studio, base install:
jdevstudio11111install.jar
3. Unzip the SOA Suite ZIP file to c:stageSOA.
4. Unzip the RCU ZIP file to c:stageSOA.
5. Additional Files needed:
o SOA Extension for JDeveloper: You will get this later using the JDeveloper update option.
o Oracle Service Bus: When you are ready to do the Oracle Service Bus (OSB) lab, you will download the
install file to install OSB.
Checking your database
Having your database up and running is the most important pre-requisite for installing SOA Suite.
1. Read the following bulleted requirements carefully to be sure you are ready to begin the SOA Suite installation:
o You need one of:
i. Oracle XE Universal database version 10.2.0.1
ii. Oracle 10g database version 10.2.0.4+
iii. Oracle 11g database version 11.1.0.7+
o You cannot use any other database version in 11gR1 (certification of additional databases is on the roadmap). Specifically, you cannot use XE Standard, it must be Universal.
o We have seen problems with installing XE when a full 10g database is already installed in the environment. The Windows registry sometimes gets the database file location confused. It is recommended to pick one or the other to avoid such issues.
When you are using XE, you will see a warning when you install the database schema that this database version is too old. You can safely ignore this warning as it applies only to production environments.
3. If needed, configure Oracle XE Universal.
When you are using Oracle XE, you must update database parameters if you have never done this for your database installation. You only have to do this once after installing. Set the processes parameter to >=200 using the following instructions.
C:OracleMiddlewarehome_11gR1user_projectsdomains domain1
binsetSOADomainEnv.cmdCODE 1
sqlplus sys/welcome1@XE as sysdba
SQL> show parameter session
SQL> show parameter processes
SQL> alter system reset sessions scope=spfile sid='*';
SQL> alter system set processes=200 scope=spfile;
SQL> shutdown immediate
SQL> startup
SQL> show parameter session
SQL> show parameter processes
The shutdown command can take a few minutes and sometimes theshutdown/startup command fails. In that case, simply restart the XE service in theControl Panel | Administrative Tools | Services dialog after setting up your parameters.
Checking your browser
Oracle SOA Suite 11gR1 has specific browser version requirements.
1. Enterprise Manager requires Firefox 3 or IE 7.
o Firefox 3—get a portable version, such as the one available from http://portableapps.com, if you want it to co-exist peacefully with your Firefox 2 installation.
o Firefox 2 and IE 6 are not supported and will not work.
2. BAM requires IE 7.
o Beware of certain IE 7 plugins that can create conflicts (a few search plugins have proved to be incompatible with BAM).
o IE 8 is not supported with 11gR1 (but is on the roadmap). IE 6 has a few issues and Firefox will not work with BAM Studio.
Checking your JDK
If you are going to install WebLogic server and JDeveloper on the same machine, you will use the JDK from WebLogic for JDeveloper too. However, if you are going to install on two machines, you need Java 1.6 update 11 JDK for JDeveloper.
You must use Java 1.6 update 11. Update 12 does not work.
Installing Admin Server and Managed Servers
Now that you have verified that everything is ready, you can begin installation.
Installing WebLogic Server
First, you install Oracle WebLogic Server.
1. To install WebLogic Server, open a command window and enter:
cd c:stageSOA
wls1031_win32.exe
2. When the Welcome screen for the install wizard comes up, click on Next.
3. Select Create a new Middleware Home and enter: C:OracleMiddlewarehome_11gR1.
4. This document assumes that path. If you use a different middleware home then adjust accordingly when C:OracleMiddlewarehome_11gR1 is referenced throughout this document.
Click on Next.
Enter email address to register for security alerts or deselect the checkbox and decline—whichever you
prefer—and click on Next.
Select Typical, and click on Next.
Review installation directories
Click on Next.
Select "All Users" Start Menu folder and click on Next.
Click on Next to start the installation process. Installation takes about three minutes.
When the installation is complete, deselect the Run Quickstart checkbox and click on Done.
Dropping the existing schema
If this is the first time you are installing, you do not need to go through this step and you should jump ahead to the Configuring schema step. Otherwise, if you are reinstalling, continue with these steps to drop your existing schema first. If you would like to keep your existing schema, jump ahead to the Configuring schema step and use a new schema prefix when prompted.
To drop your existing schema, copy the following into a command window:
cd c:stageSOArcuHomebin
rcu.bat
The bat command returns to the prompt immediately and after a few seconds,
the Repository Creation Utility opens.
On the Welcome screen, click on Next.
Click on Next.
Complete the database information.
Click on Next.
The pre-requisites are reviewed. When completed, click on OK.
The utility moves to the next page—with a slight delay, just wait for it.
The utility finds the existing schema and offers the drop-down list of all prefixes.
Check that the prefix is correct and review the schema.
In this example, we are dropping the schema with the SH prefix. Click on Next
On the drop schema warning, click on OK.
The pre-requisites for this step are reviewed. When completed,
click on OK to move to the next page—with a slight delay, just wait for it.
Click on Drop to drop the schema. This takes a few minutes.
When it is finished, click on Close.
Configuring schema
Now, create the database schema for the BAM and SOA servers.
To create the new schema, open a command window and enter the following:
cd c:stageSOArcuHomebin
rcu.bat
The bat command returns to the prompt immediately and, after a few
seconds, the Repository Creation Utility opens (if you just ran the utility to drop the
schema,it opens the second time much more quickly).
On the Welcome screen, click on Next.
Select Create and click on Next.
Enter the database information.
Click on Next.
If you are using XE, you will see a warning at this point that this version is too old. You can safely ignore this warning as it applies only to production environments.
The pre-requisites are reviewed. When complete, click on OK.
The utility moves to the next page—with a slight delay, just wait for it.
On the Select Components screen, enter DEV in the field for creating a new prefix.
Select the component SOA Infrastructure. Dependent schemas are selected automatically.
If you choose to select other components, these install instructions may not match your install experience. Also, you may have to increase processes in XE (you will get a message telling you what is required).
Click on Next.
The pre-requisites for this step are checked. When completed, click on OK.
Select the radio button to Use the same password for all schemas. Enter a schema password. The password welcome1 is assumed in this document but you should choose your own secure password or a different one for each schema and be sure to record your passwords as you will need them later.
Click on Next.
Review the tablespaces and schema owners for the components.
Accepting the defaults, click on Next, and then click on OK to create the tablespaces.
When the pre-requisites for this step are completed, click on OK.
Click on Create to create the tablespaces. This takes about two minutes.
When completed, click on Close.
Installing SOA
Once the database is configured, you can install the SOA server into the Oracle Home on the WebLogic server.
In a command window, enter:
cd c:stageSOAsoaDisk1
setup -jreLoc C:OracleMiddlewarehome_11gR1jdk160_11
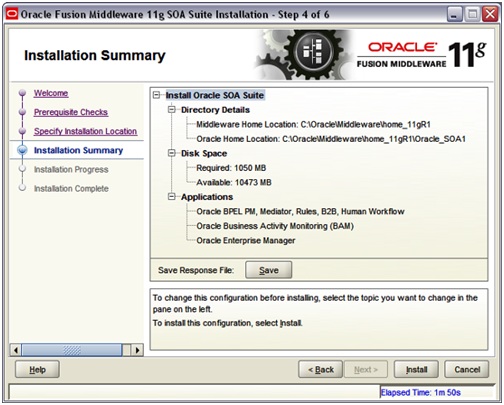
When the install wizard Welcome screen comes up, click on Next.
Wait for the pre-requisite check to complete (it's quick!).
Click on Next.
On the Specify Installation Location screen, select the middleware home:
C:/OracleMiddlewarehome_11gR1.
Enter Oracle home: Oracle_SOA1. If you use a different Oracle home, then adjust accordingly when Oracle_SOA1 is referenced throughout this document.
Click on Next.
Click on Install.
Wait for the installation to complete—it takes a few minutes.
Click on Finish.
Creating Domain
From the Oracle Home location, you configure the WebLogic server domain for the SOA and BAM servers.
In a command window, enter:
cd C:OracleMiddlewarehome_11gR1Oracle_SOA1commonbin
config.cmd
When the configuration wizard's Welcome screen comes up, select Create a new WebLogic domain, and then click on Next.
Select Generate a domain and select SOA Suite, Enterprise Manager, and Business Activity Monitoring. Dependent products are selected automatically.
Click on Next.
Enter the domain name: domain1.
Click on Next.
Enter the user name as weblogic and a password. The password welcome1 is assumed in this document but you should choose your own secure password and remember it for later in the document when the password is referenced.
Click on Next.
Select the Sun SDK 1.6_11 and leave Development Mode checked.
Click on Next.
On the Configure JDBC Component Schema screen, you select the components that you want to change, and then enter the property value for those components. First, select all of the components and enter welcome1 for the password in the Schema Password field.
With all of the checkboxes selected, enter the Service, Host, and Port values.
Now, look at the table. Review the Schema Owner column and confirm that the values are the same as what you configured in the Configure Schema section when you ran the RCU. Go back and review the screenshots in that section of this document for the schema owners if you do not remember them.
Complete the following if the schema owners need to be updated:
i. Deselect all the component checkboxes.
ii. Select BAM Schema only.
iii. Enter the Schema Owner for BAM.
iv. Next, deselect BAM Schema and select the next one.
v. Enter the schema owners one-by-one.
vi. Continue until all schema owners are entered.
Click on Next.
The data source connections are all tested.
If all are successful, click on Next, otherwise click on Previous and correct any errors.
Click on Next once more, accepting defaults (no optional configurations), and you reach the Configuration Summary screen.
If you need to configure your server on the different port then you must select (Configurations).
Click on Create.
Wait for the creation to finish—it takes just a minute.
Click on Done.
If anyone face some problem after following these steps, feel free to discuss here.